Notice · security report · web UI guide
한국어: 고지문과 보안 보고서, 웹 UI 가이드 · Related: Getting started | Usage guide
Beyond SBOM generation, BomLens produces an open-source notice (NOTICE) and a security vulnerability report in one run, and provides a web UI for users not comfortable with the CLI. This page covers how to read and use the outputs (the notice and the security report) after generating an SBOM, and how to use the web UI.
Quickstart (5 minutes)
If this is your first time, this is all you need. With the Docker engine running, move to the project folder you want to scan and run one of the two (replace SBOM with the real path to scan-sbom.sh):
Windows users: the commands below assume macOS/Linux. Pick one of the following. For installation, see Getting started.
- Replace
./scripts/scan-sbom.shwithscripts\scan-sbom.bat(Git Bash required).- Under WSL2, run the commands as-is.
- To work without the command line, double-click
scripts\sbom-ui.bat.
SBOM=/path/to/sbom-tools/scripts/scan-sbom.sh

# (A) CLI — SBOM + notice + security report in one run
cd /path/to/your-project
$SBOM --project MyApp --version 1.0.0 --all --generate-only

# (B) Browser UI — if the CLI feels like too much
$SBOM --ui            # opens http://localhost:8080 automatically (on a port conflict: UI_PORT=9090 $SBOM --ui)
When it finishes, open MyApp_1.0.0_NOTICE.html (notice) and MyApp_1.0.0_security.html (security) created in the same folder in a browser to check the results right away. See below for the detailed options.
Prerequisites
- Docker engine 20.10+ (free: WSL2 + docker-ce, or Rancher Desktop / Docker Desktop, which is paid for organizational use)
- Pull the scanner image:
- Run every example from the root of the project to scan.
Output flags are best used together with
--generate-only(save locally). Omit it to also use the trustedoss-portal (Dependency-Track compatible) auto-upload.
Generate everything at once (--all)
--all is shorthand for --notice --security. It produces the SBOM, the notice, and the security report in a single scan.
Generated files:
MyApp_1.0.0_bom.json            # SBOM (CycloneDX 1.6)
MyApp_1.0.0_NOTICE.txt          # notice (text)
MyApp_1.0.0_NOTICE.html         # notice (HTML)
MyApp_1.0.0_security.json       # security report (raw Trivy)
MyApp_1.0.0_security.md         # security report (summary)
MyApp_1.0.0_security.html       # security report (visual)
MyApp_1.0.0_risk-report.md      # open-source risk report (summary)
MyApp_1.0.0_risk-report.html    # open-source risk report (visual)
The open-source risk report (
_risk-report) is generated by default in every analysis mode (license + vulnerability tally, with response deadlines). To skip it, use--no-report. For handling each of the five input forms, see the Scenarios guide.
Open-source notice (--notice)
Gathers the components[].licenses information from the SBOM and generates a notice that groups components by license.
_NOTICE.txt— standard text, good to ship with the distribution._NOTICE.html— a browser-friendly format. All package metadata is HTML-escaped and safe.- Components with no license information are classified as
NOASSERTION.
The notice also handles the following.
- It normalizes license names to SPDX identifiers. For example, "Apache License, version 2.0" is gathered as
Apache-2.0. Entries that were duplicated because the same license was written differently are merged into one. - If the SBOM has a copyright value, it is shown per component.
- The full SPDX standard texts of 21 major open-source licenses (
Apache-2.0,MIT,BSD-3-Clause, theGPL/LGPLfamilies, and so on) are bundled at the end of the notice. This satisfies the obligation of licenses that require the full text, without separate collection. The bundled originals are indocker/lib/licenses/*.txt.
Example (text):
Security vulnerability report (--security)
Scans the generated SBOM with Trivy and reports known vulnerabilities (CVEs). (NVD + OSV + GHSA DB)
_security.json— raw Trivy JSON. For CI or machine processing._security.md— a per-severity tally table and CVE list. Good to attach to a PR or issue._security.html— a visual report with severity badges and tables.
The report does not fail the scan even when vulnerabilities exist (report-only). If you need a gate, post-process _security.json.
Priority signals (CVSS, EPSS, CISA KEV)
Severity alone makes it hard to decide what to fix first. To help with that, the report shows three more signals beyond severity. The Markdown and HTML table columns are Severity | KEV | CVSS | EPSS | CVE | Package | Installed | Fixed.
- CVSS — the technical severity score of the vulnerability (0–10). The V3 score is used first, falling back to V2 if absent.
- EPSS — the probability of real-world exploitation within the next 30 days (0–1). Queried from FIRST.org; a higher score means a greater chance of being used in an attack.
- CISA KEV — whether it is on the "known exploited vulnerabilities" list maintained by the US CISA. If it is, the HTML report marks it with a ⚠️ badge.
The table puts KEV-listed items at the top, then sorts by severity, and finally by EPSS descending. Working top-down naturally addresses the highest-risk items first.
EPSS and KEV require external API lookups. On an air-gapped network, set SECURITY_ENRICH=false to omit the two columns and still generate the rest of the report.
Interpreting results & follow-up
| Severity | Meaning | Recommended action |
|---|---|---|
| Critical | immediately exploitable, severe | top-priority patch — upgrade to the Fixed version immediately |
| High | high risk | plan a patch in the short term |
| Medium / Low | limited impact | handle during regular maintenance |
| Unknown | severity not assessed | check the CVE directly and classify |
- If the report's
Fixedcolumn has a version, raising the dependency to that version or higher resolves it. This is the fastest first response. - CI gate example. Fail the build if there is even one Critical:
- Triage such as judging false positives (no real impact), approving exceptions, and history management is beyond the scope of sbom-tools. Upload the SBOM to trustedoss-portal to handle it.
Deep license detection (--deep-license)
The basic notice covers the licenses of dependencies (3rd-party). --deep-license uses scancode-toolkit to also detect license headers in the project's own source code (1st-party).
scancode is heavy and slow (minutes to tens of minutes for a large repo). It is not in the base image; to use it, build the image as follows:
Additional output: MyApp_1.0.0_scancode.json
Deterministic output (--byte-stable)
Produces a byte-identical SBOM for the same input. It removes meaningless diffs in CI (timestamps, random IDs, ordering differences) and ensures reproducibility.
What it does: fixes metadata.timestamp to 1970-01-01T00:00:00Z, removes the random serialNumber, sorts components by purl, and sorts keys.
SBOM signing (--sign)
Creates a detached signature on the SBOM with cosign to establish supply-chain trust. It is offline key-based signing (--tlog-upload=false), so no network or OIDC is needed.
# 1) Generate a key (first time only). For a passwordless key, use COSIGN_PASSWORD=""
docker run --rm -v "$PWD":/keys -w /keys -e COSIGN_PASSWORD="" \
  --entrypoint cosign ghcr.io/sktelecom/sbom-scanner:latest generate-key-pair

# 2) Scan while signing (COSIGN_KEY=private key path, COSIGN_PASSWORD=key password)
COSIGN_KEY="$PWD/cosign.key" COSIGN_PASSWORD="" \
  ./scripts/scan-sbom.sh --project MyApp --version 1.0.0 --sign --generate-only

# 3) Verify
docker run --rm -v "$PWD":/w -w /w --entrypoint cosign \
  ghcr.io/sktelecom/sbom-scanner:latest \
  verify-blob --key cosign.pub --signature MyApp_1.0.0_bom.json.sig \
  --insecure-ignore-tlog MyApp_1.0.0_bom.json
The private key is mounted read-only into the container. Additional output: MyApp_1.0.0_bom.json.sig
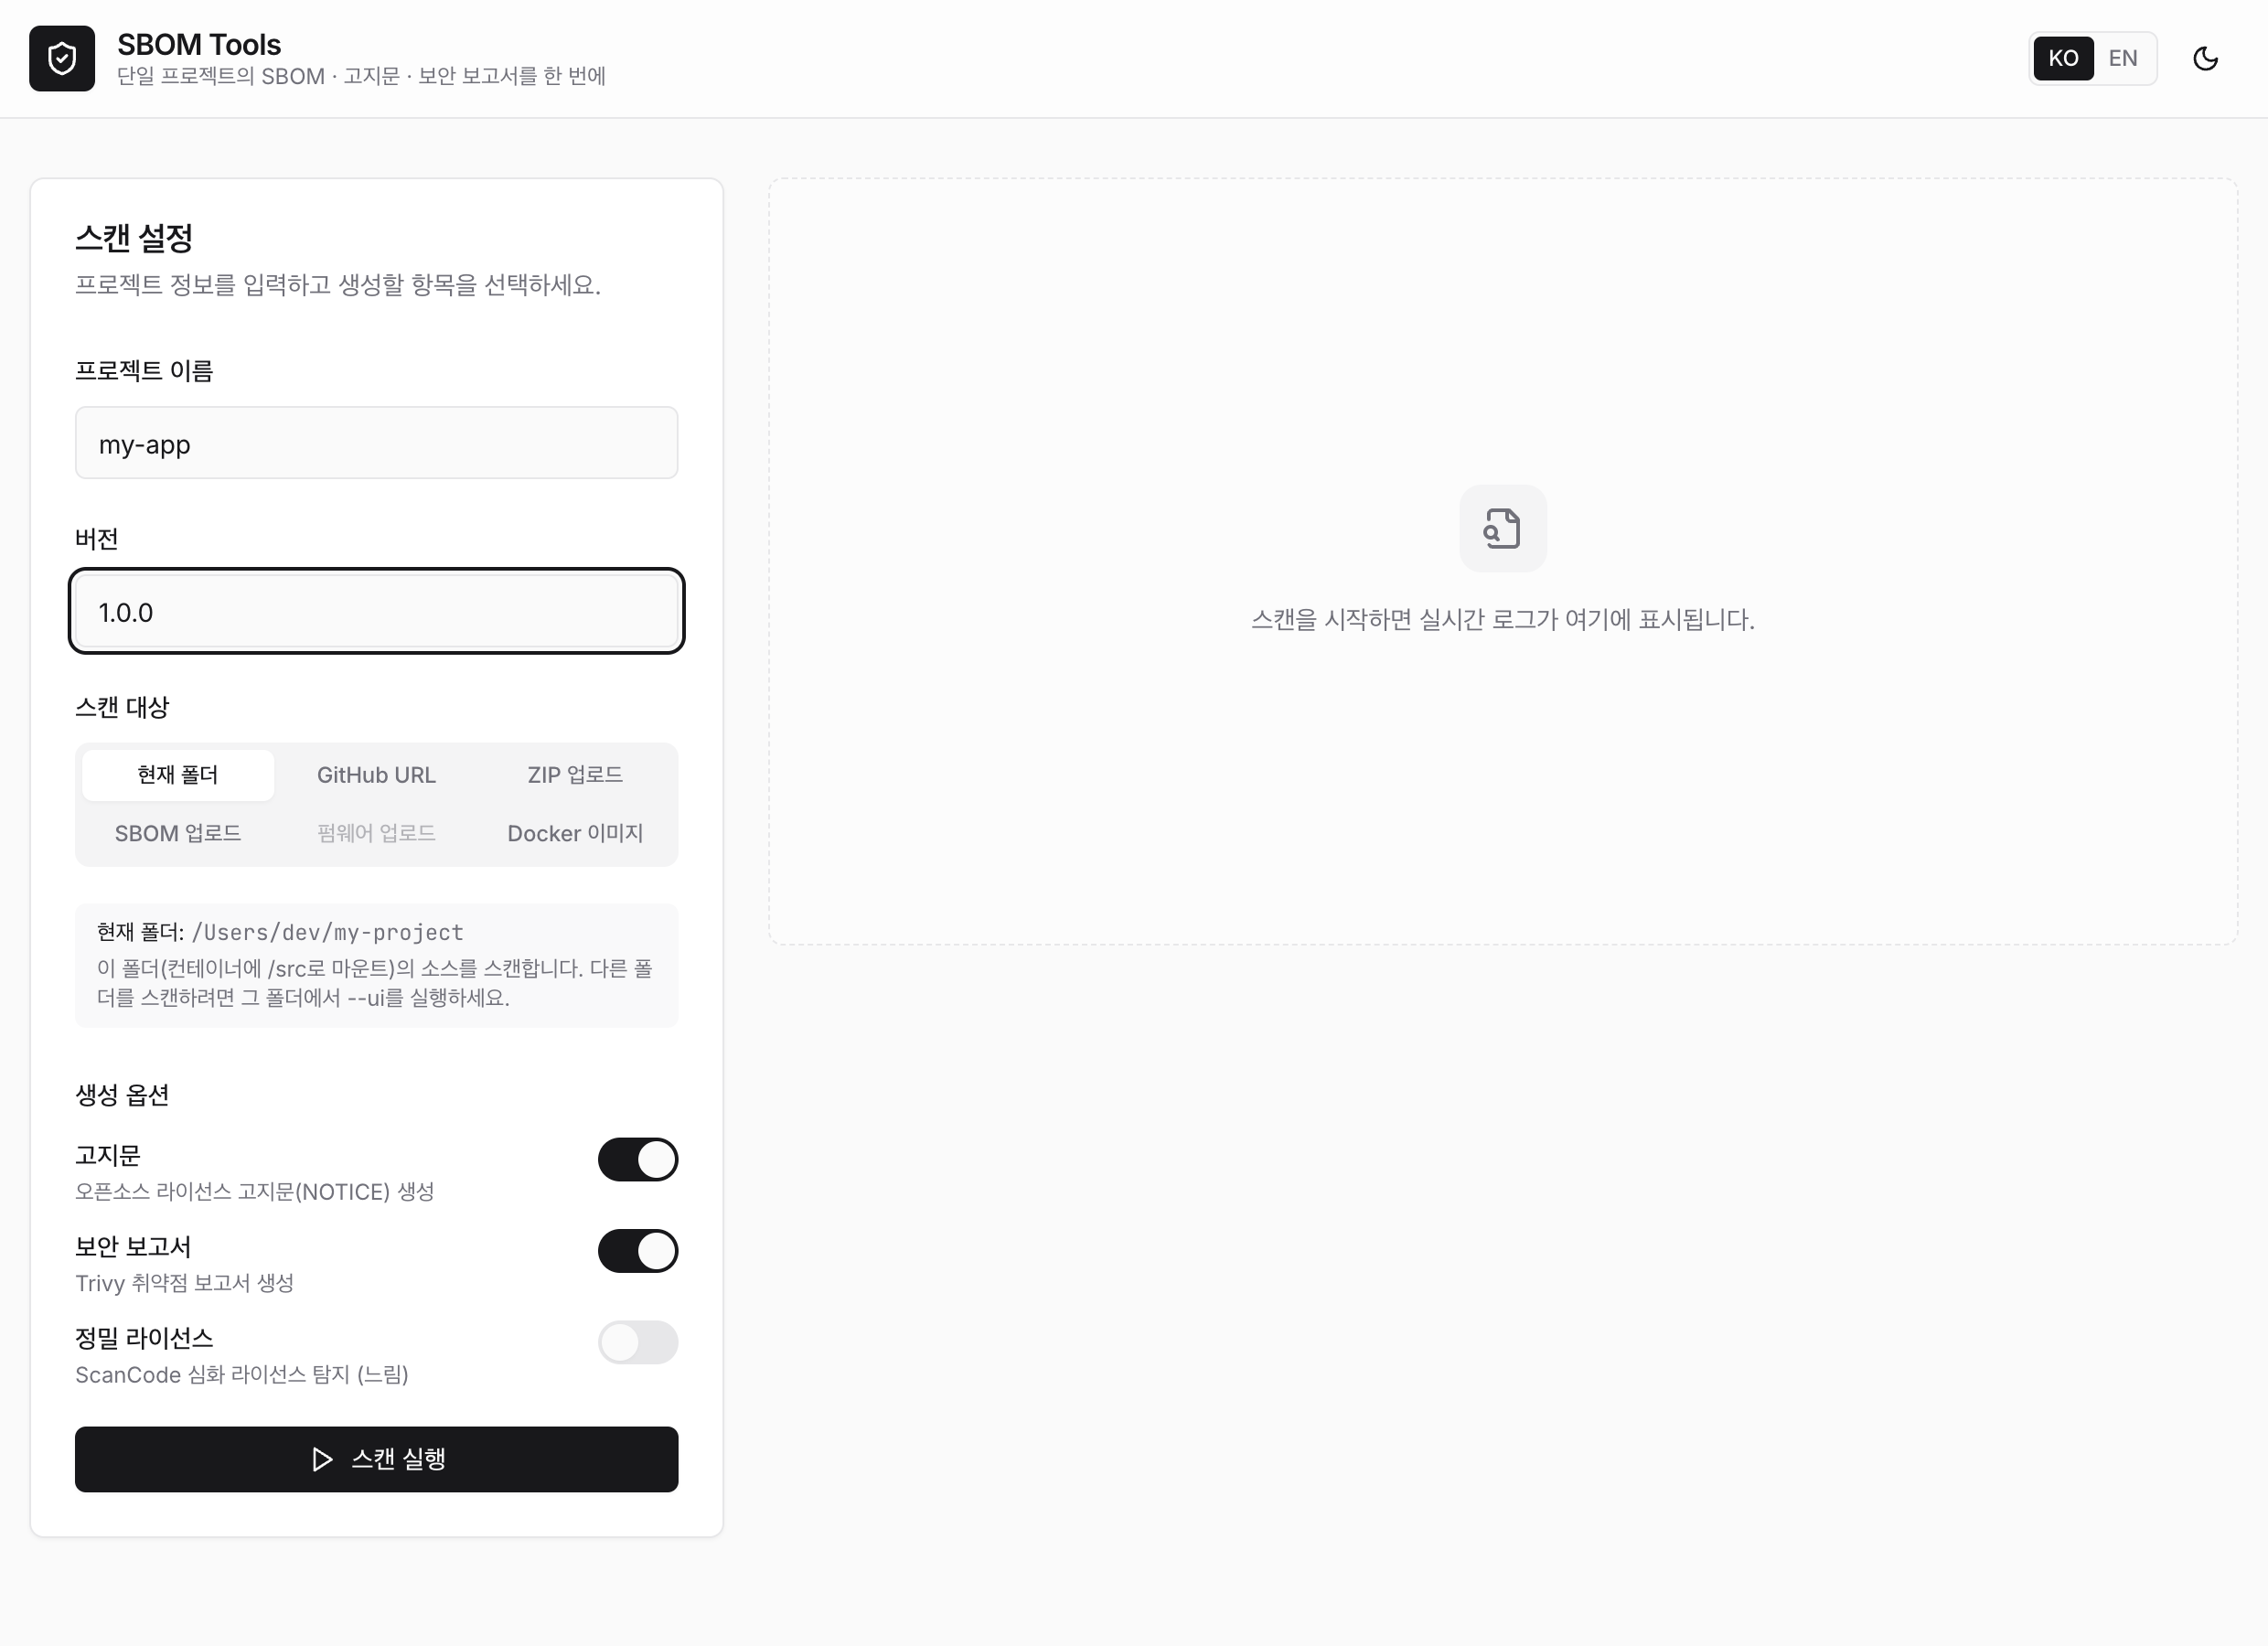
Web UI (--ui)
Scan from a browser without the CLI. The UI server is built into the scanner image, so no extra install is needed.
macOS / Linux:
cd ~/sbom-output      # output folder (anywhere is fine)
/path/to/sbom-tools/scripts/scan-sbom.sh --ui
# → opens http://localhost:8080 automatically
Windows — double-click (no command line): in the unzipped folder, double-click scripts\sbom-ui.bat and a browser opens http://localhost:8080 shortly after. Docker just needs to be running, and sbom-ui.bat works on Rancher Desktop or Docker Desktop (on WSL2, run scan-sbom.sh --ui inside WSL).
The run location is the output folder, and it scans that folder's source only when you choose "current folder" as the scan target. If you use a GitHub URL, an upload, or a Docker image, the run location does not matter.
Screen layout: 1. Scan settings — project name and version (required, inline validation), scan target selection, generation options (notice, security, deep license). 2. Scan target — choose one of six and enter or upload accordingly:
| Scan target | Input method | Backend mode |
|---|---|---|
| Current folder | scans the source in the UI's run folder | SOURCE |
| GitHub URL | enter the repository URL | SOURCE (clone) |
| ZIP upload | upload a .zip/tar file |
SOURCE (extract) |
| SBOM upload | upload an existing SBOM (JSON) | ANALYZE |
| Firmware upload | upload a .bin, etc. |
FIRMWARE |
| Docker image | enter the image name | IMAGE |
- Run the scan — a real-time log streams during the run. Errors (clone failure, no socket, unsupported file, and so on) are shown clearly in the log.
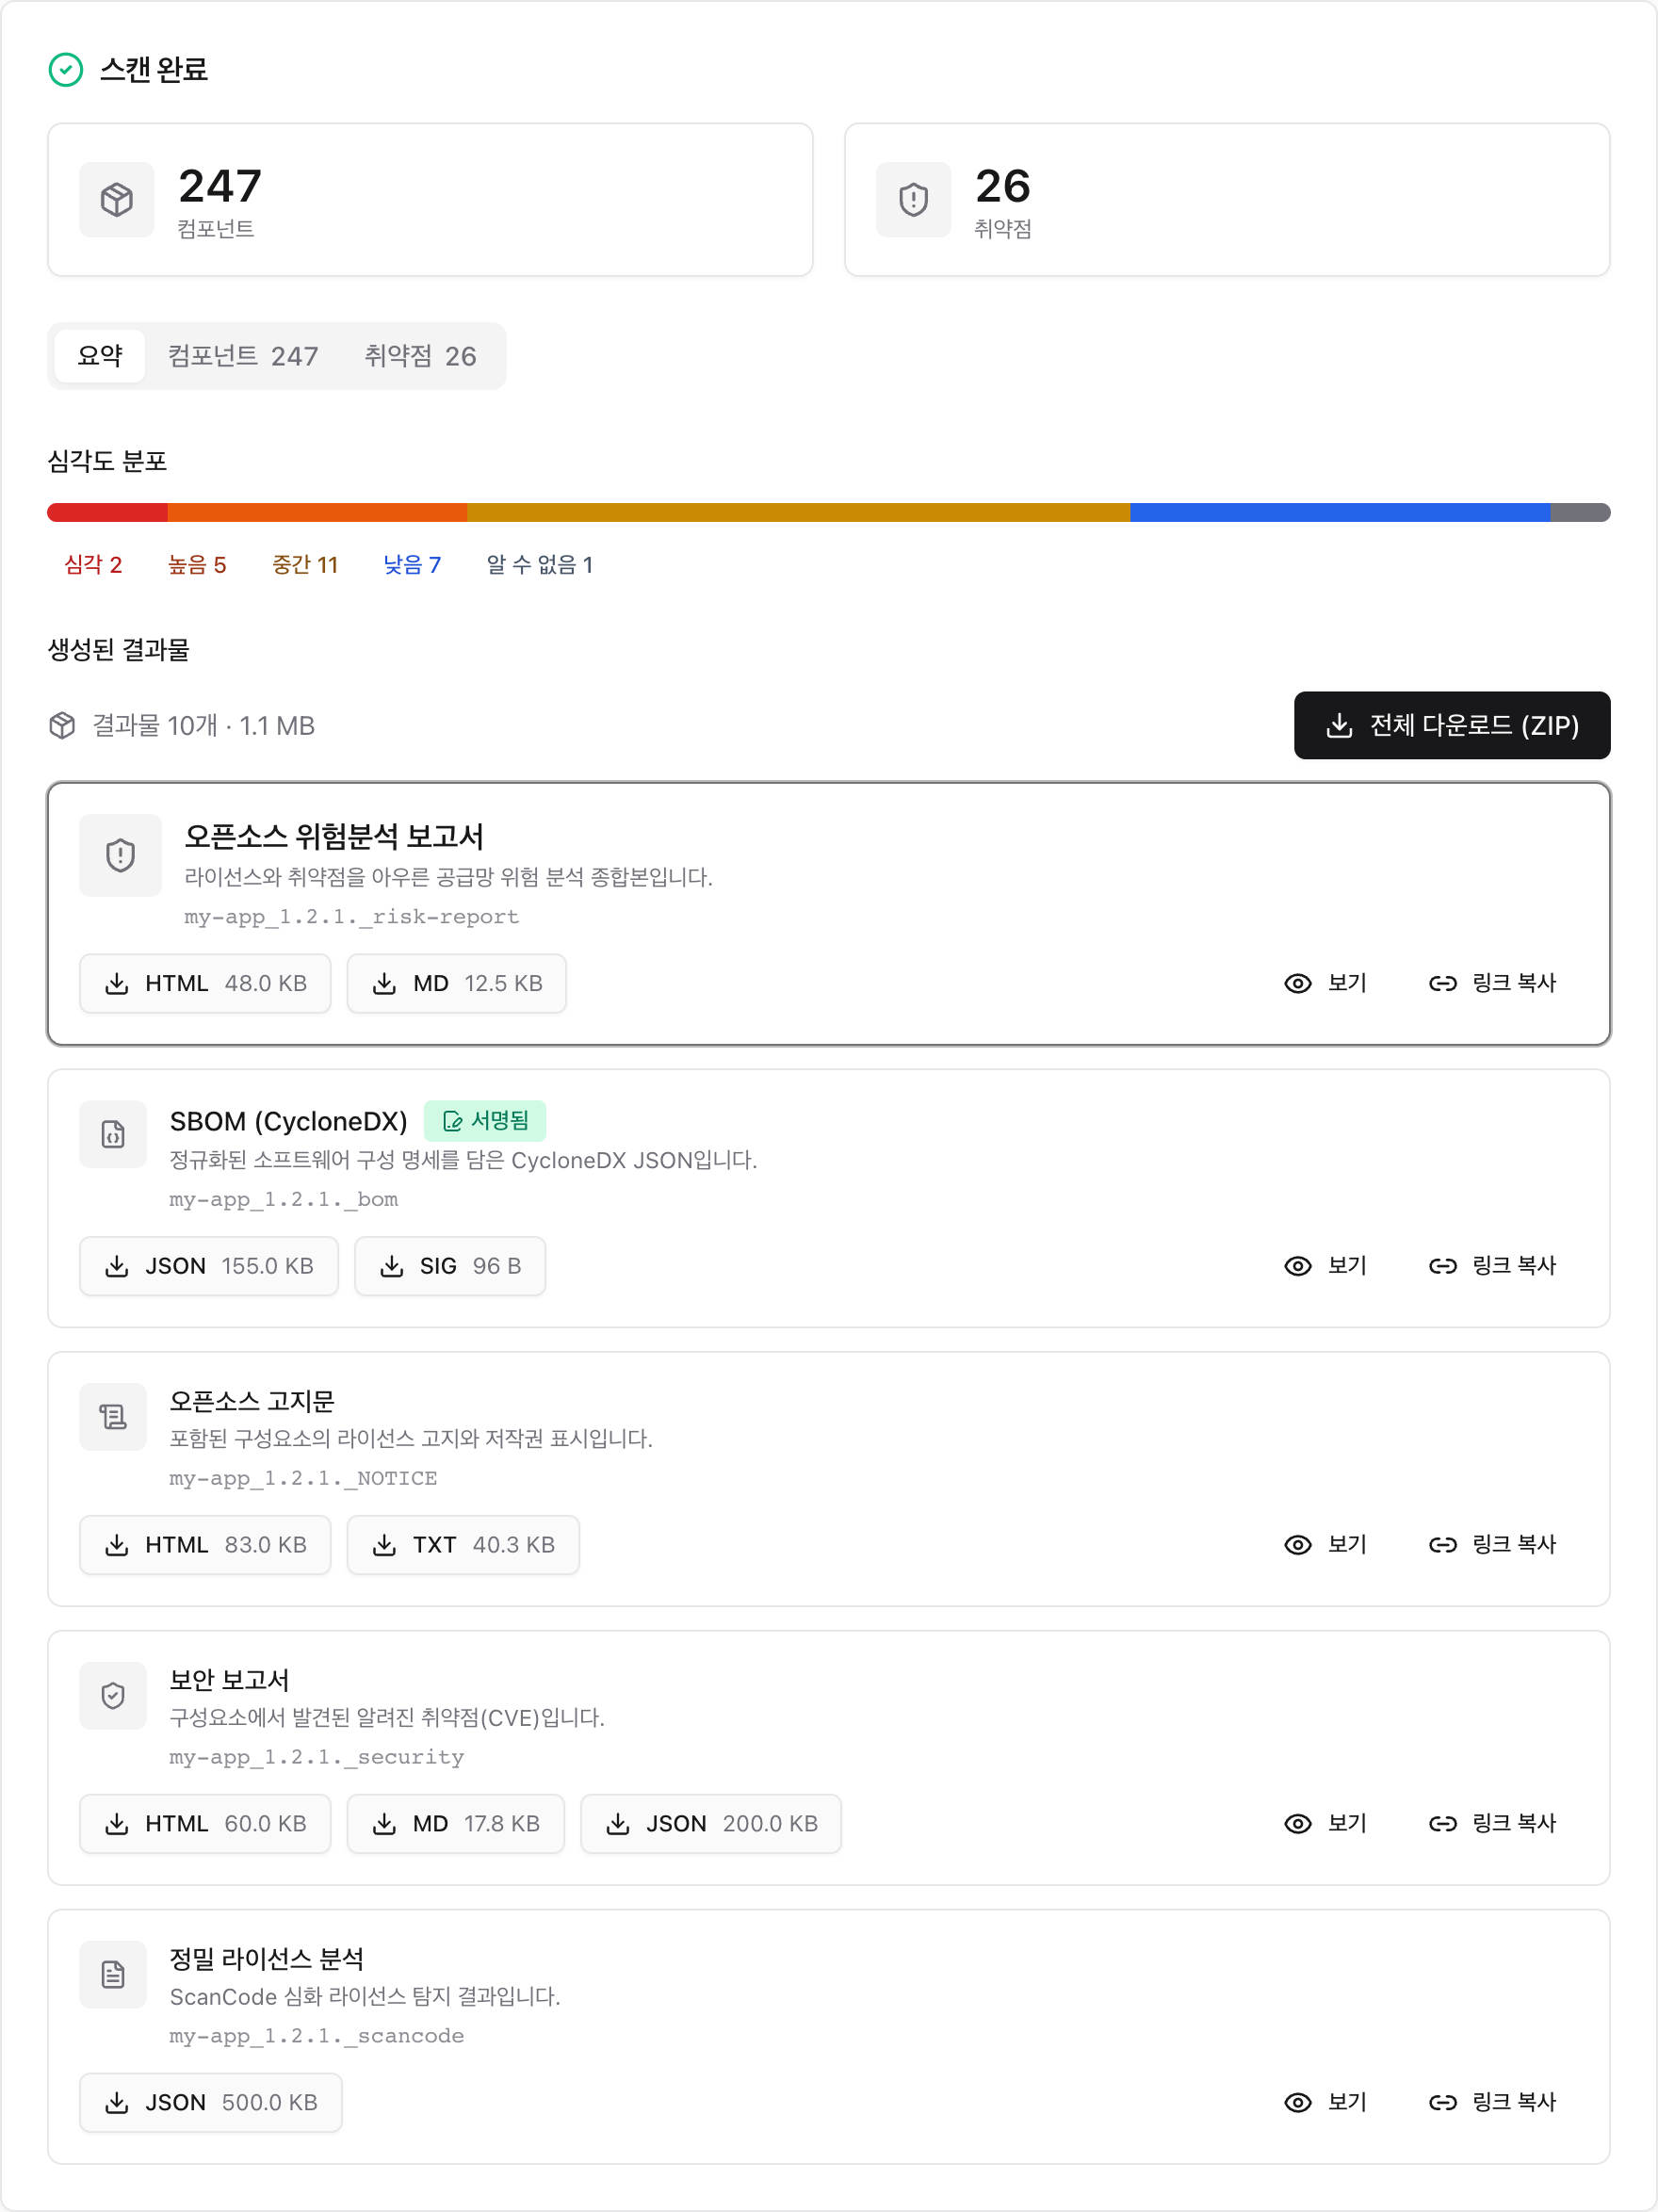
- Summary — when done, it shows the component count, vulnerability severity badges, and, for a supplier SBOM, a conformance (pass/fail) card.
- Outputs — open or download the SBOM, notice, open-source risk report, security report, and conformance directly from a table. The risk report is highlighted.
Use the 한국어 / EN toggle at the top right to change the display language.
Results screen
When the scan finishes, the results card shows the summary and the outputs together. Outputs are grouped by kind with a title and description, downloadable as per-format chips (HTML/Markdown/JSON) or as a single ZIP. The risk report is highlighted at the top.
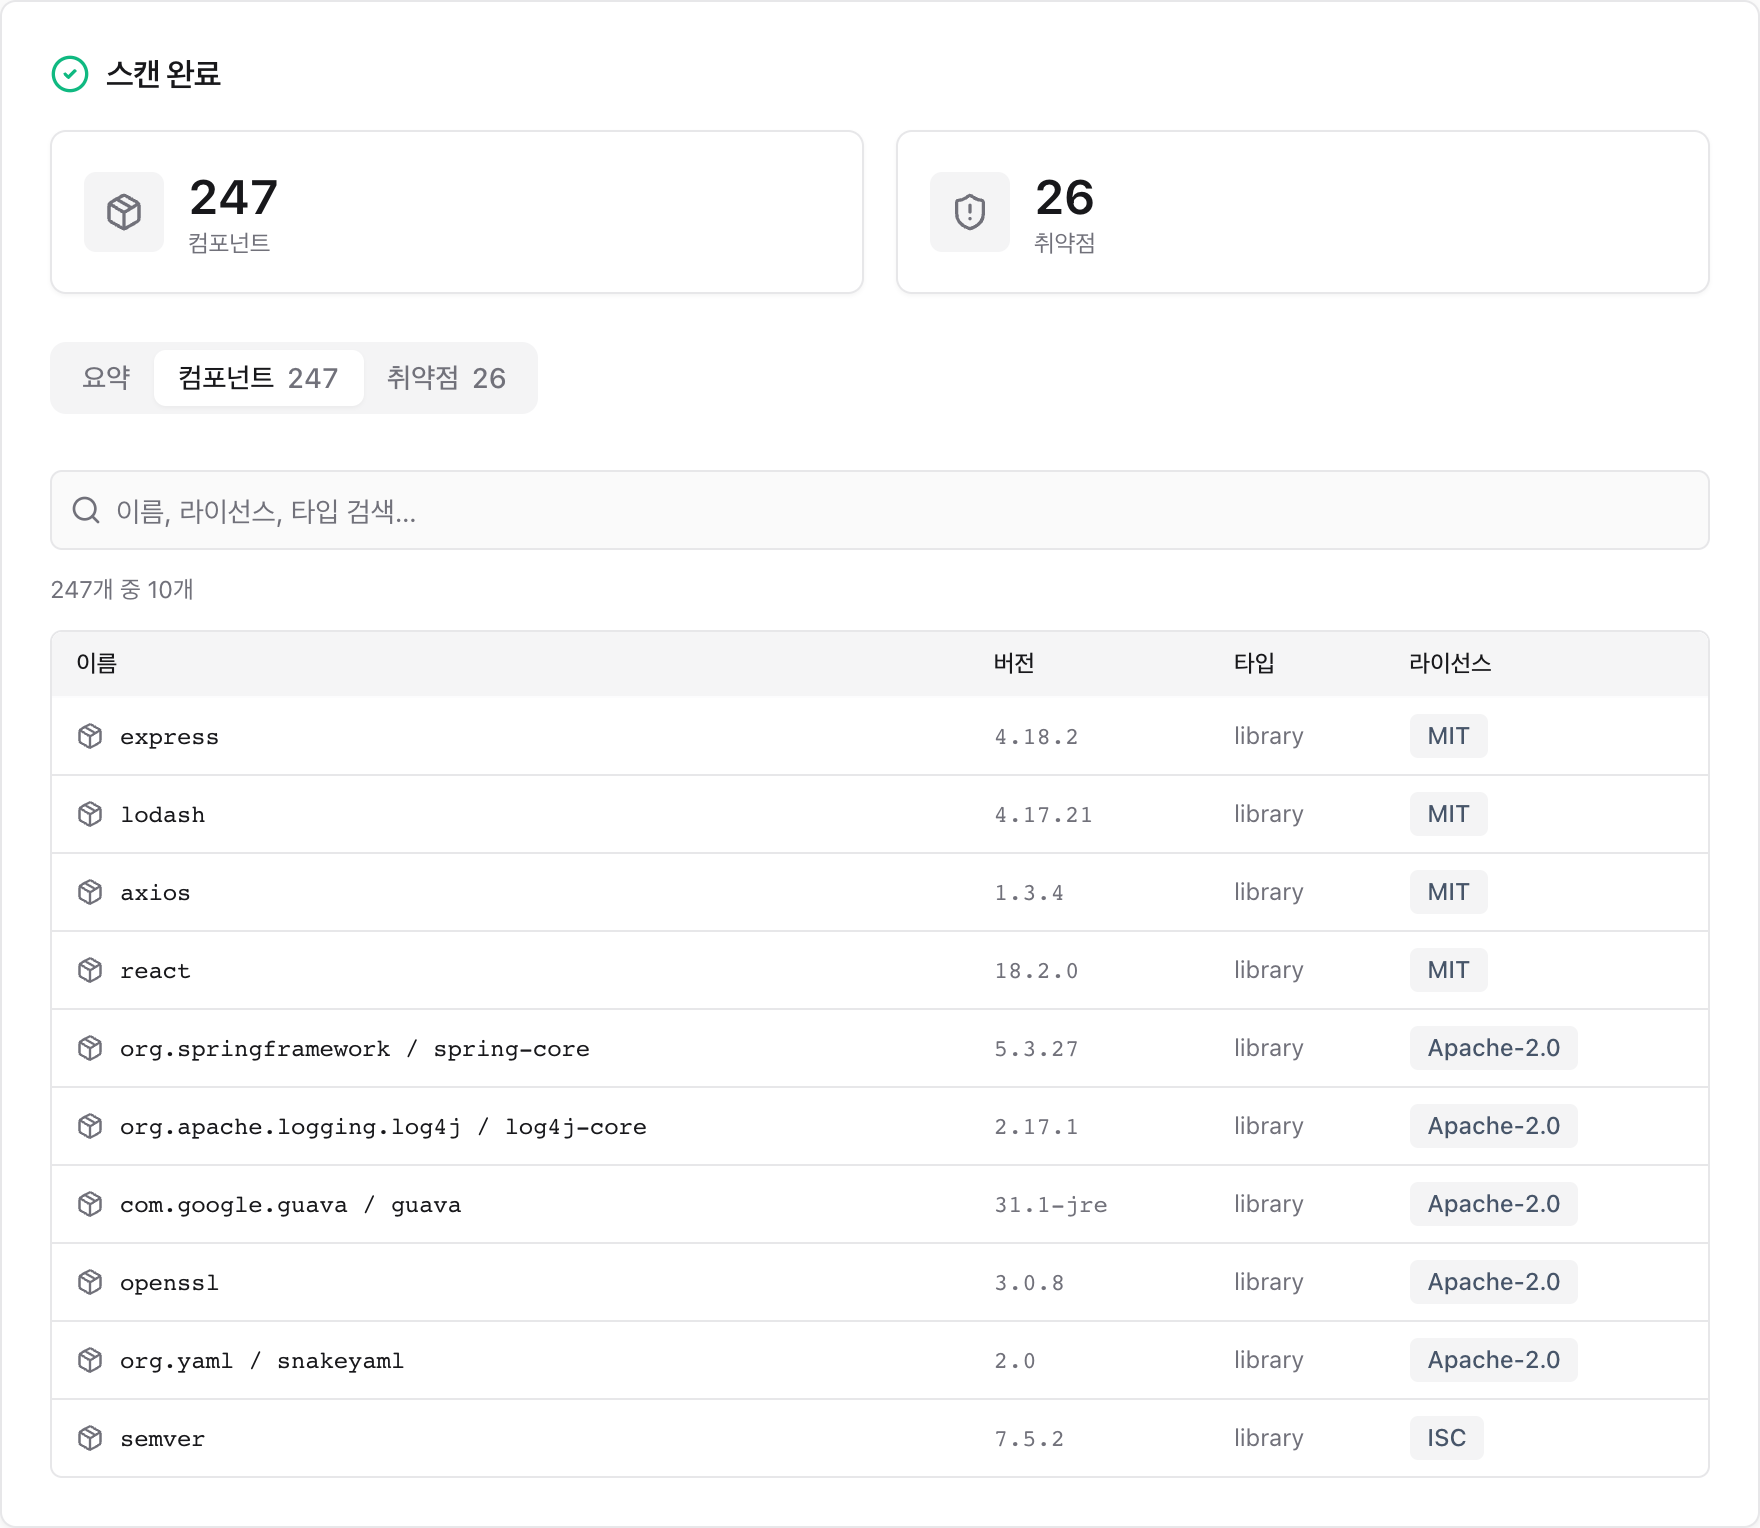
The Components tab lets you browse and search the detected components by name, version, type, and license.
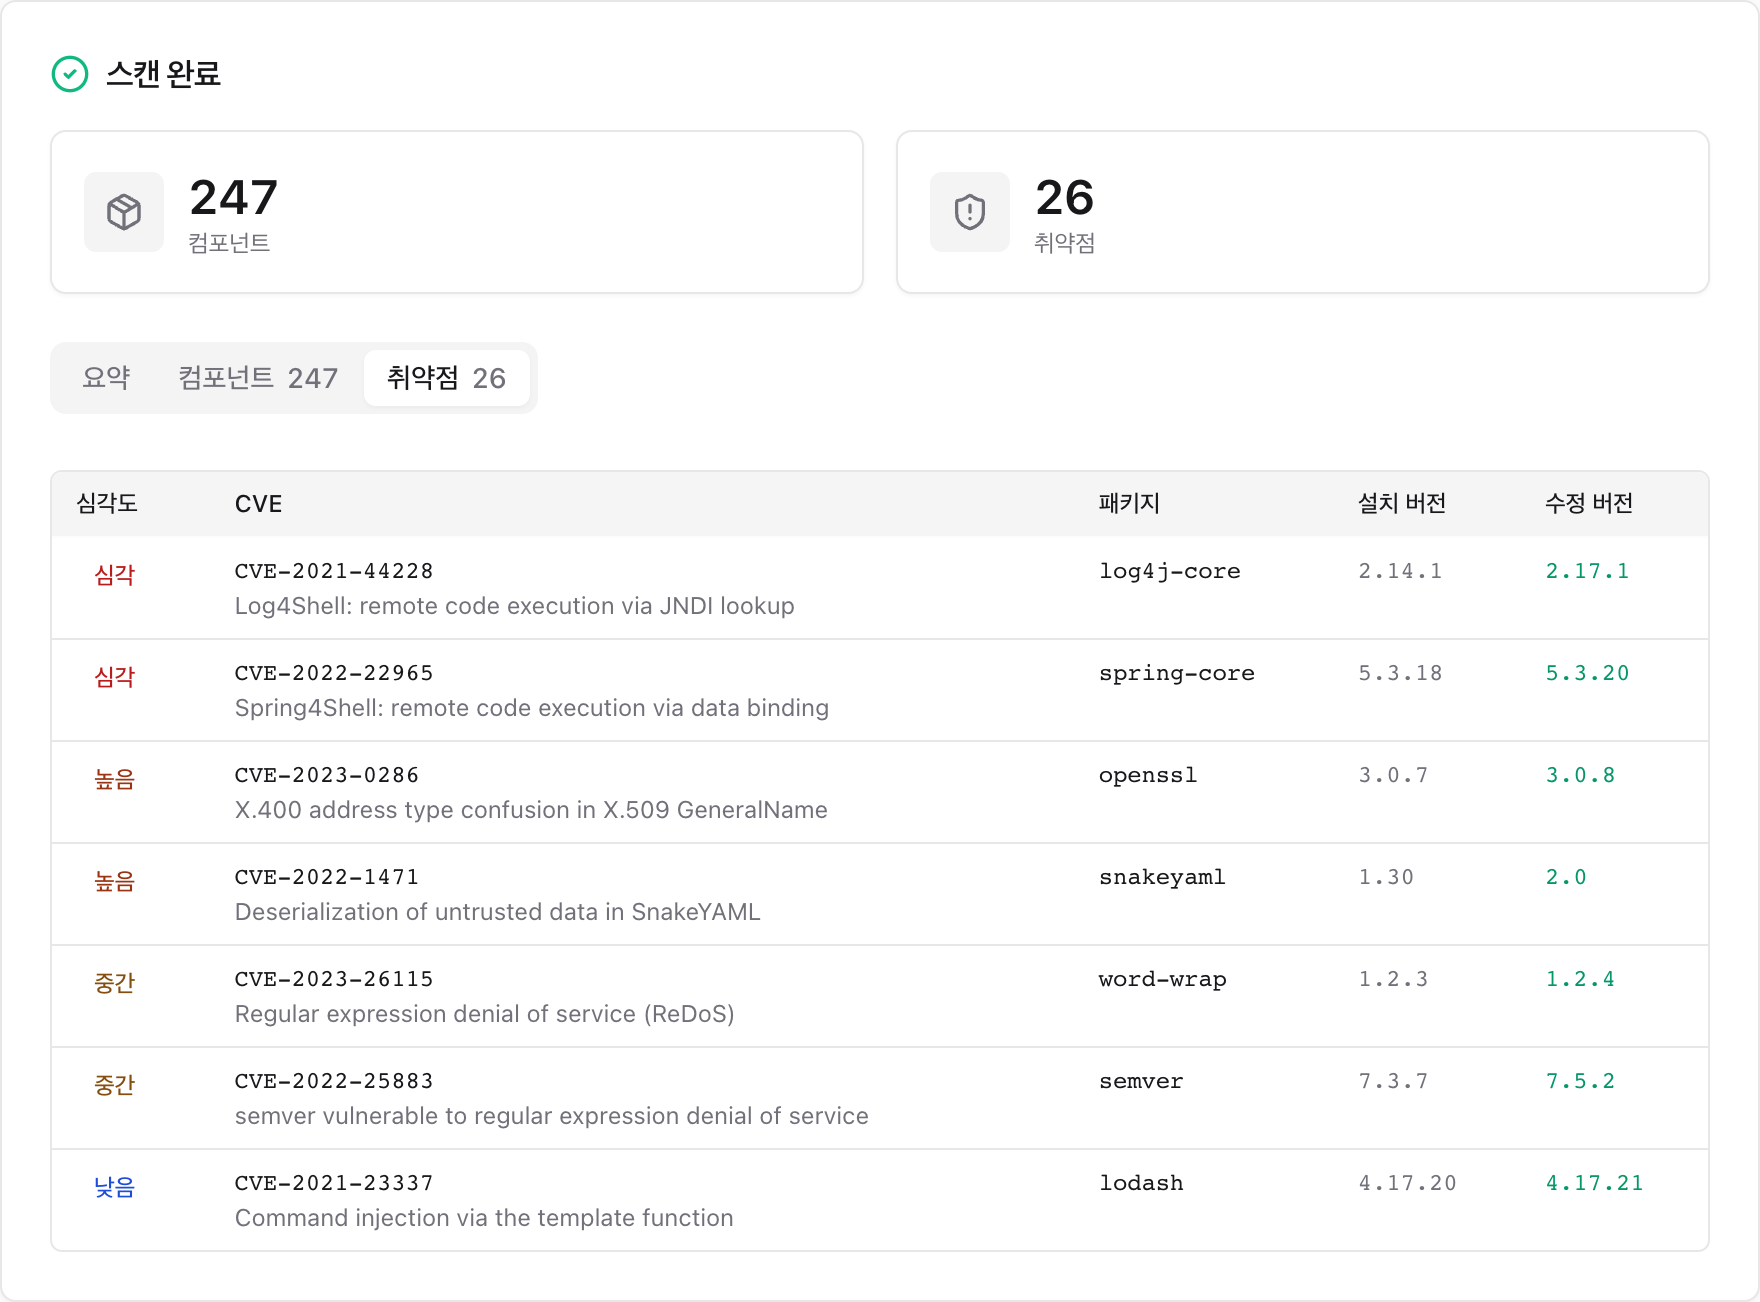
The Vulnerabilities tab shows the severity distribution and CVE details (including installed and fixed versions).
Choosing SBOM upload (ANALYZE) automatically enables notice and security for the risk analysis. The firmware upload tab is enabled only when the UI runs from an image that includes the firmware tools:
SBOM_SCANNER_IMAGE=ghcr.io/sktelecom/sbom-scanner-firmware:latest ./scripts/scan-sbom.sh --uiNote: the UI's source scan (current folder/ZIP/GitHub) analyzes the directory with syft inside the container. Components are captured only when there is a lock file (
package-lock.json,go.sum, and so on) or installed dependencies. If you only have a manifest and need deeper resolution, use the CLI source mode (cdxgen).
Changing the port / on a conflict: if the default port (8080) is taken by another service, specify a different port:
Note: even though the UI is easy, a Docker engine must be installed and running (free: WSL2 + docker-ce, or Rancher Desktop). The launcher detects a missing or stopped Docker and shows the install link.
Output files at a glance
| File | When generated | Description |
|---|---|---|
{P}_{V}_bom.json |
always | SBOM (CycloneDX 1.6) |
{P}_{V}_NOTICE.txt / .html |
--notice / --all / risk report default |
open-source notice |
{P}_{V}_security.json / .md / .html |
--security / --all / risk report default |
Trivy security report |
{P}_{V}_risk-report.md / .html |
default (all modes) — omit with --no-report |
open-source risk report |
{P}_{V}_conformance.json / .md / .html |
--analyze |
format conformance report |
{P}_{V}_scancode.json |
--deep-license |
raw scancode result |
{P}_{V}_bom.json.sig |
--sign |
cosign signature |
{P} = project name, {V} = version (special characters are normalized to _).
Troubleshooting
| Symptom | Cause / fix |
|---|---|
trivy not installed ... skipping |
old image. Pull the latest image with docker pull. |
--deep-license requested but scancode not in image |
build the image with --build-arg SBOM_DEEP_LICENSE=true. |
Docker is not running in the UI |
start the Docker engine (Rancher Desktop/Docker Desktop, etc.) and run it again. |
Many NOASSERTION in the notice |
the dependencies have no license metadata. Supplement with --deep-license or check manually. |
Port conflict (--ui) |
specify a different port with UI_PORT. |
For the detailed design background, see the direction study (Korean).