Getting started
From install to your first SBOM, step by step. The fastest path needs no command line — download the app and double-click.
Just want an SBOM or a notice quickly, no commands? Start with the no-CLI quick start.
BomLens runs on a Docker engine, but the desktop app and web UI set it up and pull the image for you. You only manage Docker yourself for the CLI — see Requirements below if you still need to install one.
Start without the command line (recommended)
Download BomLens for Windows (.exe) and double-click it; the UI opens with no console window. On first run it checks Docker, pulls the scanner image (about 250 MB), and opens http://localhost:8080. The app is unsigned for now, so if Windows SmartScreen warns, click More info, then Run anyway. A click-by-click walkthrough is in the no-CLI quick start.
Prefer scripts over an installer? The sbom-ui.bat alternative is covered step by step in Path B of the no-CLI quick start.
Web UI
No commands beyond launching it: run in the browser, scan, and download results.
git clone https://github.com/sktelecom/bomlens.git && cd bomlens
./scripts/scan-sbom.sh --ui     # opens http://localhost:8080; results save under the current folder
#   Windows: double-click scripts\sbom-ui.bat
The folder you run from is the output base — each scan saves to a {Project}_{Version}/ subfolder under it (details in Where outputs go). If the port is taken, prefix UI_PORT=9090 (bash only — on Windows, put UI_PORT=9090 in scripts\bomlens.settings.txt next to sbom-ui.bat instead; see Settings file). To scan the current folder as the source, run from that project folder; for a GitHub URL, ZIP, SBOM, firmware, or Docker image you supply the input in the UI, so any folder works.
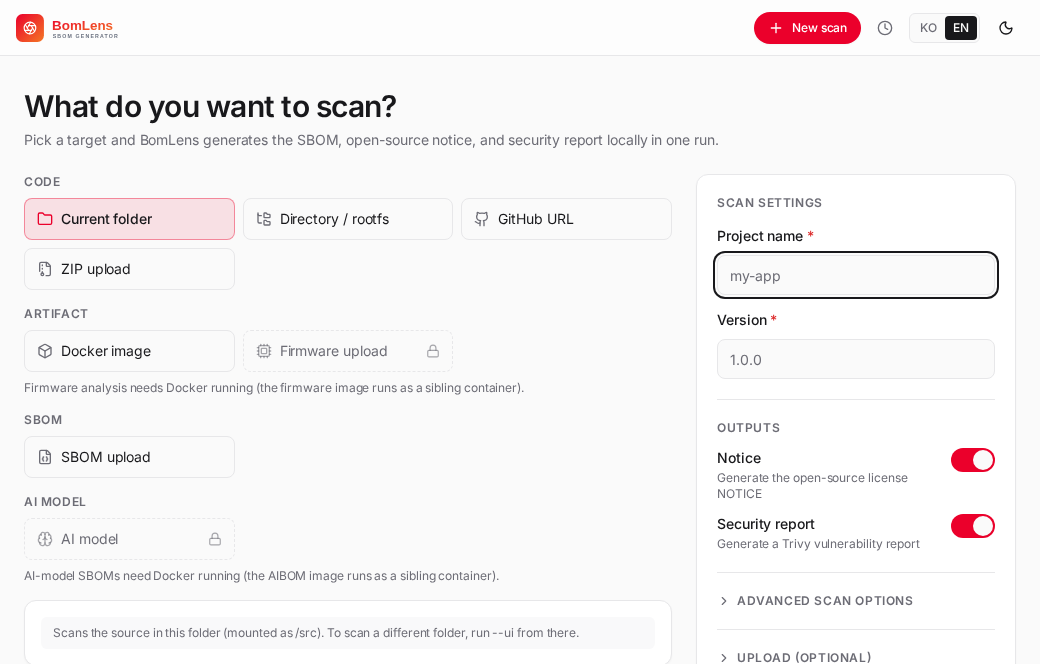
- Enter a project name and version.
- Pick a scan target: current folder, GitHub URL, ZIP upload, SBOM upload, firmware upload, or Docker image.
- Click Run scan — logs stream live.
- View or download the SBOM, the notice, the risk report, and the security report.
Screen layout and per-target details are in the web UI reference.
Your first SBOM (CLI)
Advanced — for automation and CI. Run from the cloned repo. The command below scans the bundled Node.js example; point --target at your own folder, or drop --target to scan the current directory instead.
# All deliverables for the bundled example project
./scripts/scan-sbom.sh --project "MyApp" --version "1.0.0" --target examples/nodejs --all --generate-only
This produces a CycloneDX SBOM, an open-source notice, a security report, and a risk report named MyApp_1.0.0_…, all in a MyApp_1.0.0/ subfolder of the current directory.
# From a GitHub URL, without cloning first
./scripts/scan-sbom.sh --project "MyApp" --version "1.0.0" --git "https://github.com/org/repo" --all --generate-only
Other inputs — a ZIP source (--target app.zip), an existing SBOM (--analyze sbom.json), firmware (--target dev.bin --firmware), a Docker image (--target nginx:latest) — are in the input-scenarios guide.
--generate-onlysaves the outputs locally without uploading (the vulnerability scan still runs).--allproduces the notice, the SBOM, and the risk report in one run. The full options are in the CLI reference; to upload the result to TRUSCA or a Dependency-Track server, use--trusca <project_id>(orUPLOAD_TARGET) — the steps are in the upload guide.
Understanding the results
Each scan lands in a {Project}_{Version}/ subfolder, and the files inside are named {Project}_{Version}_…, for example MyApp_1.0.0/MyApp_1.0.0_bom.json:
| File | What it is |
|---|---|
{Project}_{Version}_bom.json |
the SBOM (CycloneDX 1.6) |
{Project}_{Version}_NOTICE.{txt,html} |
open-source notice (고지문) grouped by license |
{Project}_{Version}_security.{json,md,html} |
Trivy vulnerability report |
{Project}_{Version}_risk-report.{md,html} |
open-source risk report (licenses + vulnerabilities), generated by default |
The SBOM is CycloneDX 1.6 JSON:
{
  "bomFormat": "CycloneDX",
  "specVersion": "1.6",
  "version": 1,
  "metadata": {
    "timestamp": "2026-01-15T10:30:00Z",
    "component": {
      "type": "application",
      "name": "MyApp",
      "version": "1.0.0"
    }
  },
  "components": [
    {
      "type": "library",
      "name": "express",
      "version": "4.18.2",
      "purl": "pkg:npm/express@4.18.2",
      "licenses": [
        { "license": { "id": "MIT" } }
      ]
    }
  ]
}
Key fields
| Field | Meaning |
|---|---|
metadata.component |
the scanned project (name, version) |
components |
the open-source components found |
components[].purl |
Package URL — the unique package identifier |
components[].licenses |
license info (SPDX ID) |
Quick checks on the SBOM
The examples below use jq. On WSL2 (Ubuntu) install it with sudo apt-get install jq, on Windows Git Bash with winget install jqlang.jq. If installing it is a hassle, the web UI overview shows the component count and licenses directly:
# Component count
jq '.components | length' MyApp_1.0.0/MyApp_1.0.0_bom.json

# Unique licenses
jq '[.components[].licenses[]?.license.id] | unique' MyApp_1.0.0/MyApp_1.0.0_bom.json
Requirements
BomLens needs only a Docker engine — not a specific product.
| Item | Minimum |
|---|---|
| Docker | 20.10+ |
| Memory | 4 GB+ allocated to the Docker engine |
| Disk | 4 GB+ (for the Docker image) |
| OS | Linux, macOS, Windows |
| Arch | AMD64, ARM64 |
Every published image, including the opt-in --firmware and --deep-cve ones, supports both architectures, so pulling any of them on an ARM64 host (an Apple Silicon Mac, an Arm server) works natively; see the Docker image reference for the full list.
The memory figure is for the engine itself (the VM behind Docker Desktop, Rancher Desktop, or Colima on macOS), not the host machine. Tools like Colima default to 2 GB, which is enough for a manifest-only scan but too tight for languages where BomLens has to run an actual build to resolve transitive dependencies (Java/Gradle, Java/Maven). Under 4 GB, that build step can be killed for running out of memory, and the scan falls back to a shallower, direct-dependencies-only result. A scan that runs a Maven or Gradle build (Java, Android, or a mixed project with a pom.xml or build.gradle) on an engine with less than about 4 GB prints a warning before the build starts, with the setting to change (colima stop && colima start --memory 4 for Colima, Settings > Resources > Memory for Docker Desktop; with the WSL 2 backend, Rancher Desktop on Windows or docker-ce in WSL2, set memory=4GB in %UserProfile%\.wslconfig and run wsl --shutdown). The warning is a hint and does not stop the scan. If the dependency graph still looks thin, check the scan's warnings for a note about it.
If you already run a Docker engine (Docker Desktop, Rancher Desktop, docker-ce in WSL2, anything), just confirm it works:
Installing Docker on Windows for the first time
Docker Desktop is simplest, but it needs a paid license above a certain organization size. Free options:
| Option | Notes |
|---|---|
| WSL2 + docker-ce (free) | Install docker-ce inside WSL2 Ubuntu and run scan-sbom.sh there. No .bat, no Windows named pipe, no path-conversion issues. CLI only — does not work with the .exe installer flow above. |
| Rancher Desktop (free, GUI) | A drop-in GUI replacement for Docker Desktop with a docker CLI. Works with the .bat double-click and desktop-app flows. |
| Docker Desktop | Easiest, but check licensing for organizational use. |
If you started with the installer (the .exe), install Rancher Desktop or Docker Desktop instead of WSL2 + docker-ce — the desktop app doesn't yet know how to reach Docker running inside WSL2, so it will keep reporting "Docker isn't installed" even after you set that up.
WSL2 + docker-ce, the short version (admin PowerShell):
Then inside WSL (Ubuntu):
sudo apt-get update && curl -fsSL https://get.docker.com | sudo sh
sudo usermod -aG docker "$USER"  # log out and back in to apply
docker pull ghcr.io/sktelecom/bomlens:latest
Clone the repo inside WSL and run ./scripts/scan-sbom.sh ... as above. For the CLI on Windows without WSL2, install Git for Windows (Git Bash) and use scripts\scan-sbom.bat.
Next steps
| Goal | Doc |
|---|---|
| Input forms (GitHub, ZIP, SBOM, firmware) | Input scenarios |
| Notice, security & risk reports, web UI | Reports guide |
| Every option and CI/CD | CLI reference |
| Language example projects | Ecosystems |
| Internals | Architecture |
| Contributing | Contributing guide |
Related: CLI reference | Input scenarios